TripTik® Travel Planner tips
TripTik tips
Our counsellors share their tips and tricks by answering the most frequently asked questions about the TripTik® Travel Planner.
- Enter your starting location in the “A” search box.
Enter your destination in the “B” search box.
Add additional stops by clicking on the “+” symbol. This is optional.
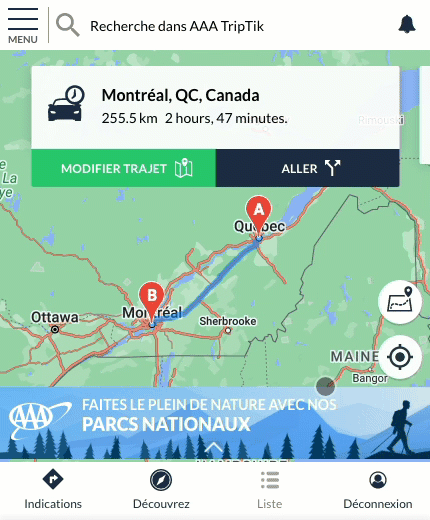
Click on “START TRIP” to start generating your route.
If you make any changes to your itinerary, you will need to click on “START TRIP” again for the changes to be displayed.
- Create your route, then click on “START TRIP.”
In the Trip details section (the one displaying duration in hours and kilometres), click on the “Share” icon (between “Save” and “Print”).
A pop-up window will show you 3 ways to share your route: by email, via Facebook or via X (formerly Twitter).
To send the link to your route by email, click on the envelope icon.
To post the link to your route on Facebook or X (formerly Twitter), click on the corresponding icon.
Since the link represents your personalized itinerary, we recommend that you copy the URL of the link and paste it into a new tab of your Internet browser. This way, you’ll be able to save the route to your favourites.
If you make any changes to your route, don’t forget to save the new link. Each itinerary is assigned a unique link, which expires 6 months after it was created.
Yes, there are two ways to add stops to your route.
Option 1: When creating a route, press the “+” icon to add stops.
Option 2: For longer trips (over 4 hours), you can add additional stops at given distance or time intervals using the “Route Intervals” feature.
After generating the route, adjust the time or distance between stops by dragging the “Route Intervals” option slider from left to right. You can select “Time” for intervals of 2 to 12 hours or “Distance” for intervals of 200 to 1200km (100 to 600mi).
Once you’ve selected the desired interval, click on “Set” to see your potential stops as red circles along the route. (To remove the circles, select “Clear.”)
Select one of the circles to zoom in on that area. The circle covers a radius of 3.2km (2mi) and displays gas stations, restaurants and hotels on the map.
If you make changes, add or remove stops, save the new link. Each itinerary has a unique link, which expires 6 months after it was created.
Personalizing information on the map
To change languages or add information to the map (road construction, rest areas, or real-time traffic):
Click “Menu”.
Select “Settings” (on a computer it will be displayed automatically).
You can display the options you want and change the Trip Planner language (although the menus and descriptions of the itinerary are in French only).
On a tablet or smartphone, you can change the type of map: default, relief, or satellite.
On a computer, the map type “options” is in the top right corner of the map.
Changing itinerary options
Converting kilometres to miles and avoiding toll roads, highways, or ferries:
From the “Indications” menu, on tablet or smartphone, click on the arrow in the bottom left corner of your screen.
Then select “options”.
Select the desired itinerary options.
Click “Close” to go back to the “Indications” screen.
Setting up your trip as a PDF
Click “menu”.
Click “PRINTABLE OPTION”.
CAA recommends keeping the default options.
Click “CREATE A PRINTABLE VERSION” to options create a PDF of your itinerary.
Using your itinerary as a PDF
You can view it offline (after you save it on your mobile device).
It includes step-by-step maps and descriptive cues.
It indicates major road construction when the trip was set up, if option selected when creating your TripTik® itinerary.
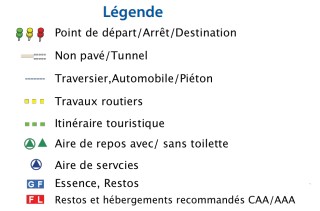
It shows certain services at highway exits:
G (gas): gas stations
F (food): restaurant, CAA/AAA-recommended in red
L (lodging): accommodations, CAA/AAA-recommended in red
Rest areas: with services or without
You can enlarge the image for better itinerary viewing on tablets.
It’s backlit on mobile devices to light your way, day or night.
Saving a PDF
Apple devices:
Follow the instructions on the Apple website.
For Android devices or computers:
Once the PDF has been created in the TripTik® Travel Planner, a download message will appear; choose Download.
Once downloaded, the PDF will appear in the Downloads folder.
Displaying points of interest
The planner lets you display all kinds of points of interest and services on the map:
CAA/AAA-recommended hotels and their Diamond rating
CAA/AAA-recommended restaurants and their Diamond rating
Tourist attractions, including those that offer CAA/AAA member discounts
Gas stations, including gas prices
Campgrounds
CAA/AAA Approved Auto Repair Service Locations
Member benefits with partners
CAA/AAA offices
Note: The car rental supplier is AAA’s, so its discounts aren’t offered to CAA-Quebec members. See a counsellor for more information.
On a computer:
The icons represent points of interest below the “menu” and the search bar.
On a smartphone or tablet:
To open the icon menu, click “Discover” at the bottom of your screen.
Select points of interest. To close the points of interest window, click the arrow.
With the points of interest displayed on the map, you can view them in list form by clicking “List“.
Follow your itinerary on a mobile device with the TripTik Travel Planner
After creating your itinerary, you’ll see a pop-up at the top of your screen showing the distance and how long your trip should take.
By sliding that window to the left, you get directions for the next leg of your trip.
The map showing the directions will be downloaded.
The route you need to take will be highlighted in color
The red dot indicates the place where the maneuver will have to be made
You can display the list of directions by tapping on the directions window.
Press the “X” to close the list of directions.
Continue sliding the window to the left to display the next indications.
Warning
Warning: The GO option, which is displayed on the first window, will take you out of the Travel Planner and into the GPS navigator of your smartphone or tablet. It will create a new itinerary regardless of the one you have planned. This new itinerary will not take into account any stops or changes you have planned on your route. CAA-Quebec does not recommend using this option.